
 She gave the blocks back to me months ago and so I put this quilt at the top of my to-sew list. The applique is not exactly like the pattern in the magazine; we changed it up a bit for a more sophisticated look.
I also have a new sewing machine to play with, the Laura Ashley Limited Edition "Isodore" from Brother, so now it's time to shove a stack of "stuff" onto the floor and piece the other five blocks:

The little four-patch in the center combines a green print with a green-on-white polka dot. That is surrounded by a peachy-pink floral ; the corners are a brown/blue/pink butterfly print that is one of the fabrics from a quilt for a cure line by Marcus Brothers. Interspersed among the butterflies are words in script, such as "Hope", "Kisses", "Friends" and "Love".
Next, the pattern called for 20 flying geese to measure 2" x 4" finished. I used the method that takes one large square and four small squares to make 4 units. To make them the size required, one 5-1/4" square of one fabric and four 2-7/8" square of the other were needed.

On each of the smaller squares, a line is drawn from corner to corner to act as a guide for the sewing.
Then two small squares are pinned to one large square, as shown.
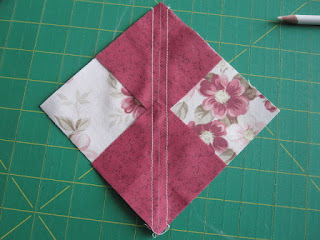
I stitched 1/4" on each side of the marked line...
...then used the marked line as a cutting line.
At right, the two resulting pieces after pressing.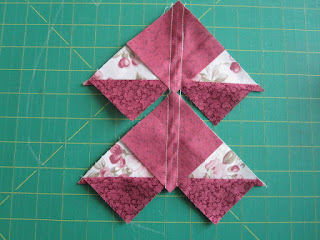
I pinned another small square to each of the pieced units and then stitched 1/4" on either side of the marked line.
After cutting on the marked line, pressing and trimming off the notches, I have a pile of little bitty triangles and four flying geese units that measure 2-1/2" x 4-1/2".

When I stitch these to the other block components, the finished size will be 2" x 4".

That was a great tutorial on flying geese! You really made it clear and the pictures are great. Thanks, Paula!
ReplyDeleteIsn't that the best flying geese method??? Did a demo for our little quilt group and they couldn't believe it. Now they all are targeting patterns with flying geese components!!! That machine is quite something. Exciting days ahead.....Hugs,Doreen
ReplyDelete