

Went to my local quilt shop yesterday to see the webinar broadcast by Bernina of America about their new cutting tool. The tool can be used with any Bernina machine that has embroidery capability as all of the sewing is done "in the hoop". The webinar showed how the tool worked as well as ideas for using it.
The blade on the tool is very sharp, so several layers can be cut at the same time. The tool could be used not only for cutwork, but was also demonstrated making dimensional appliques from suede, leather and other difficult to cut fabrics as well as reverse applique on a sweatshirt.

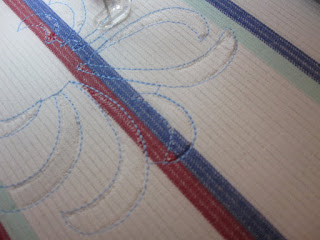
After the webinar presentation, Dawna Harrison (one of the shop owners) demonstrated its use by doing cutwork on a tea towel. Some very important tips were given in the webinar and Dawna went over these as well: First, make sure that your fabric is stiffened, either by using starch or, as the webinar recommended, Mary Ellen's Best Press. If the fabric is soft, you won't get optimal results.

The design can be transferred to the sewing machine using several methods; Dawna used a USB stick. She hooped the tea towel with a layer of Aqua Tear for stabilizer.The first sewing is done with the embroidery foot attached and the machine threaded to do the outline of the design.

After the outline is stitched, the cutting tool is attached, the stitch plate is changed to the cutwork stitch plate (comes with the cutwork tool and is specific to your machine model) and the top thread is removed, although you may leave the bobbin in since the blade of the cutting tool does not reach the bobbin case. Second big tip: Turn off the sensors that stop the machine when the thread breaks or runs out; since you are not using thread, the machine will keep stopping unless you turn these off.
The tool has four directions, represented by numbers on the top of the blade -- if you look just above the blade and to the right, you will see the number "1". After the tool cuts everything in that direction, the machine stops and the color bar area will indicate that you manually change the direction. It's easy to do; you just reach in and turn it.
At this point, all of the cutting has been done....

A couple of pictures of Dawn lifting out the fabric from the cut areas with the point of her scissors.


Then she re-threaded the machine for the embroidery portion of the cutwork design, removed the cutting tool and reattached the embroidery foot. She also smoothed a square of Aqua Mesh Plus, a sticky backed water soluble stabilizer to the back of the design to improve stitch quality. One thing I am learning about machine embroidery is that the proper stabilizer is absolutely the key to good results!

Embroidery done....

Here is another tea towel that Dawna had done previously. She held it up so that you could see the cut out areas. After the stabilizer was washed out, there were some threads and fabric showing, but she felt that two factors could have made the work better:
One: She did not stiffen the fabric enough for the tool to get a clean cut.
Two: The webinar showed a foot (#29 or the new #44, echo and cutwork foot) attached to the machine while using the cutwork tool. Dawna did not use a foot for the embroidery immediately above, but she did use it for the blue embroidered piece that she did for the demo. It looked like the piece using the foot got better results.
A few things interested me here: One thought popped into my mind when I was watching the demonstration of dimensional applique on the webinar; could you use fusible stabilizer so that your applique could be directly pressed onto its background? I want to play with this further. I also feel that the cutting tool could be used for various trapunto applications, since the most tedious part of that technique is cutting away excess batting.
Some food for thought and a new toy to play with!
I think the cut work is really pretty.
ReplyDeleteOn another note: I have to say I love my Bernina 830. But I am an older woman with very little knowledge of the computer, only what I have taught myself and I feel like I have bought over my head or intelligence, I live in a rural area and I bought my machine in a Hancock store. Now the Bernina part has pulled out and I have so far to go for lessons. Does anyone else have this problem. Thanks for listening. Juanita
Juanita,
ReplyDeleteIf you have the new 8Series 830, there is much information on the www.berninausa.com website. There is even an 8Series website and you can download an 830 (or 820) simulator to your computer. You can "virtually" put the machine through its paces without using your machine. If you go to the area on the Bernina website that asks if you have a dealer, they can give you the names/locations (using your zip code) of dealers who may be willing to work with you long distance. Also, the tutorials inside the machine itself and in the manual are very user friendly. Go for it! If you learn one little thing today, you will build on it tomorrow. YOU CAN DO IT - never let age stop you. I've been known to read and re-read directions many times, I repeat, many, many times. And, it always takes me longer to do something. So what? At least I'm doing something I enjoy.
Juanita, please look at my latest post which gives all of the tension settings that have worked well for me. Also, do find a dealer; it is really worth the drive to be able to learn this new marvelous machine!
ReplyDeleteGear cutting tool design and production requires much specialized knowledge, which has been acquired and refined over generations.
ReplyDeleteworm wheel Hobs